Set up TS to send FX deals to FXall Settlement Center for matching and to import the result, so that matched deals are confirmed in TS automatically.
Before you start
- Set up a meeting with FXall. They need to make some preparations on their side before the integration can be finalised.
- TS connects to FXall Settlement Center through FXall's web service. FXall gives you a user name and password for it. Save them as a credential in TS, see Credentials and Password.
- Ask FXall to set up option 2 below. By default, FXall sets up option 1.
How deals reach FXall Settlement Center
- All deals made in FXall are sent to FXall Settlement Center automatically.
- No deals made in FXall are sent automatically. A deal made in FXall is imported into TS. TS runs the deal matching rules and sends the deals to FXall Settlement Center.
TS recommends option 2. Deals made through other channels, such as chat or phone, are then matched automatically in FXall Settlement Center too, not only deals made on the trading platform.
Steps
Set up the export integration
- Go to Autopilot › Integrations.
- Select Add integration.
- Select the FXall SettlementCenter API Exporter plugin.
- Enter a name for the integration.
-
On the Basic tab, select Use FX All webservice and choose your FXall credential in Credential. TS sends the deals to FXall's production address. To use the test address instead, also select Test environment.
Environment Address Test https://qc.int.fxall.com/stpdirectProduction https://qc.fxall.com/stpdirect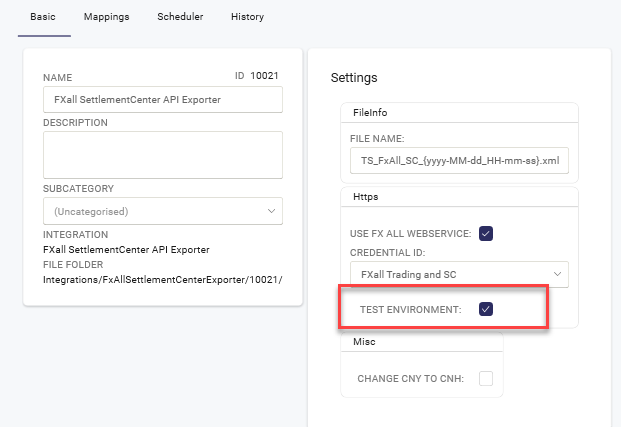
-
On the Settings tab, enter a name in File name, for example
FxAll_SC_{yyyy-MM-dd_HH-mm-ss}.xml.
- Select Apply.
-
On the Mappings tab, map every legal entity and counterparty whose deals are to be sent for matching.

Set up the import integration
- In Autopilot › Integrations, select Add integration.
- Select the FxAllSettlementCenterImporter plugin.
-
Enter a name for the integration. The import needs no other settings.

Schedule the export and the import
Set up two activities, one for the export and one for the import, that each run every 15 minutes.
- Go to Autopilot › Activities.
- Select Add activity.
-
On the Basic tab, enter a name and choose the integration in Plugin ID.

- On the Scheduler tab, select Add schedule.
- Enter a schedule name, a start date, a start time and an end time.
-
In Time interval, choose Every 15 Minutes.

- Repeat steps 13 to 17 for the other integration.
Don't give the two activities the same start time.
Set up the matching rules
Matching rules give deals, entered by hand or imported, the deal matching status To be sent.
- Go to Settings › Matching Rules.
- Select the plus icon to add a rule.
- In Selection, choose the deals to match through FXall Settlement Center, for example the deal types FX and FX Swap and the company type External.
- In Matching status, choose To be sent.
-
In Deal matching source, choose FxAll Settlement Center.

Result
Deals that fit a matching rule get the status To be sent. The export sends them to FXall Settlement Center, and their deal matching status changes to Sent for matching.
In the Confirm view, you can't confirm a deal with the status To be sent or Sent for matching by hand. TS confirms the deal after a successful Settlement Center import.
FXall only sends a message to TS when a deal is matched. A deal that isn't matched stays in the Confirm view with the status Sent for matching. Log in to FXall Settlement Center to find out why it wasn't matched.